Share this idea
Let It Snow
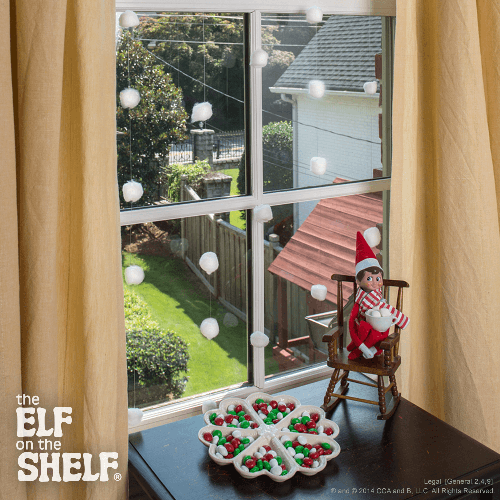
Materials:
- Pom-poms or cotton balls
- Fishing wire
- Needle
Instructions:
- Scout Elves begin this task by threading a needle with fishing wire.
- Next, they’ll pierce cotton balls or pom-poms with the needle, threading them onto the fishing wire, keeping each pom-poms several inches apart (elves can create their own pom-poms by following the directions below). To keep them in place, elves tie a knot under each pom-pom to prevent sliding.
- The finished string will be hung in front of a window, so it looks like snow is falling outside! The elves create as many strings as necessary to fill the window and trim fishing wire so it isn’t too long for the window chosen. Let it snow!
- To create their own pom-poms, elves use a secret technique from the North Pole. They start by wrapping yarn around a fork—just like you would spaghetti!
- To create smaller pom-poms, your elf wraps the yarn around the fork about 20 times. For bigger pom-poms, yarn is wrapped around the fork about 50 times. The wraps are always tight and your elf is sure to keep the yarn in the middle of the fork!
- Once the yarn is wrapped around the fork the desired number of times, your elf holds the wrapped yarn in place and uses scissors to cut the yarn wrap from the rest of the ball of yarn.
- Your elf takes a shorter piece of yarn, about 2 inches long, and ties it vertically around the yarn wrap while it’s still on the fork.
- After pulling the wrap off of the fork, your elf pulls the small string tighter and ties it in a knot. The wrap will become flat and round; the ends are a series of tiny loops. By tying another knot on top of the one already created, your elf makes sure the yarn bundle is secured in place!
- Using scissors, the elf cuts the little loops apart—the pom-pom is beginning to form!
- To keep the pom-pom symmetrical, the elf snips off any errant pieces of yarn.